§ 6 — C#: From Scratch
While And Do-While
Okay, let’s talk about a couple more ways to iterate in C#.
There are two more forms of iteration that we shall talk about, and those are while and do while. Let’s discuss the difference between them.
Let’s say you have a condition in here, some condition, and this condition is true.
class Program
{
    static void Main(string[] args)
    {
        bool condition = true;
    }
}
}
In programming, there’s a special primitive type that handles whether something is either true or false, boolean data types cannot have any other value but true and false.
For instance you can assign a boolean value such as:
bool condition = true;But we can also do something like:
bool condition = 1 > 0;The statement here is that if 1 is bigger than 0 then the boolean value of the condition variable is true, otherwise it’s false.
You can put while(this condition is true), continue to print (condition is still true).
While (condition)
Console.WriteLine("Condition is still true");
class Program
{
static void Main(string[] args)
{
bool condition = true;
while (condition)
{
Console.WriteLine("Condition is still true");
}
}This is also an infinite loop because the condition is hardcoded to true. There’s no other possible condition except for true. Therefore, it will keep iterating forever.
Let’s use a better example.
namespace Demo.App
{
    class Program
    {
        static void Main(string[] args)
        {
            int i = 0;
            while (i <= 10)
            {
                Console.WriteLine("Condition is still true");
            }

            Console.ReadKey();
        }
    }
}
Let’s put an iteration in our code here. If we put ‘i’ in, starting from 0, and it will stop when ‘i’ becomes greater than 10.
int i = 0;
While (i <= 10)
Now in this current state, this will keep running forever because ‘i’s’ value doesn’t change. ‘i’ will always be zero and therefore never become greater than 10.
What we can do to increase the value of that variable with every pass is to use something that we used in the for-loop:
{
    int i = 0;
    while (i <= 10)
    {
        Console.WriteLine("Condition is still true");
        i++;
    }

    Console.ReadKey();
}i++;Let’s note here what i++; actually means. It simple means one step. It can be represented in 3 ways:
while (i <= 10)
{
    Console.WriteLine("Condition is still true");
    i = i + 1;
}

Console.ReadKey();
}i++;
i = i + 1;
i += 1;while (i <= 10)
{
Console.WriteLine("Condition is still true");
i += 1;
}
Console.ReadKey();
}Let’s now print the value of ‘i’ in here. That way we can double check the value we are using.
Console.WriteLine($"Condition is still true {i}");
i++;
int i = 0;
while (i <= 10)
{
Console.WriteLine($"Condition is still true {i}");
i++;
}
Console.ReadKey();You can see here that we used the string interpolation dollar sign $ again, to pass in the value of the variable ‘i’ into our printed out string.
Now when we run this, it will continue to print until it reaches 10 and then it will stop.
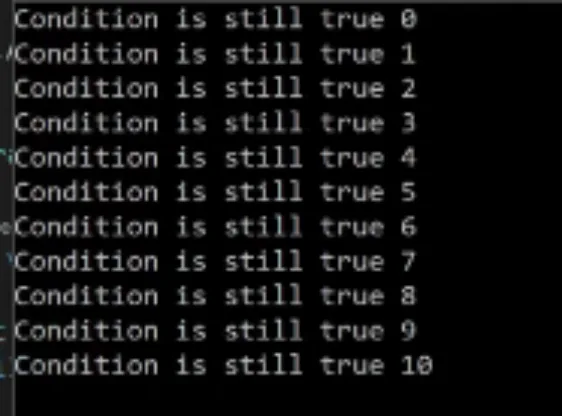
‘While-loop’ is the idea that you continue to iterate until a certain condition isn’t true anymore.
If we compare this with the ‘for-loop’ - in a ‘for-loop’ you’re iterating through a list or a number of things until you reach the end of it.
Let yourself think about the use cases for each of these.
For instance, you can use ‘while-loop’ to ping a server as long as the server is alive. Once the server does not return that it is alive anymore, then stop pinging that server and shut it down.
namespace Demo.App
{
    class Program
    {
        static void Main(string[] args)
        {
            int i = 0;
            while (i <= 10)
            {
                Console.WriteLine($"Condition is still true {i}");
                i++;
            }

            do
            {
                Console.WriteLine($"Condition is still true {i}");
                i++;
            } while (i <= 10);

            Console.ReadKey();
        }
    }
The question now is, what about ‘do-while’?
‘Do-while’ is different from ‘while’ in that it has to do at least one iteration before it stops.
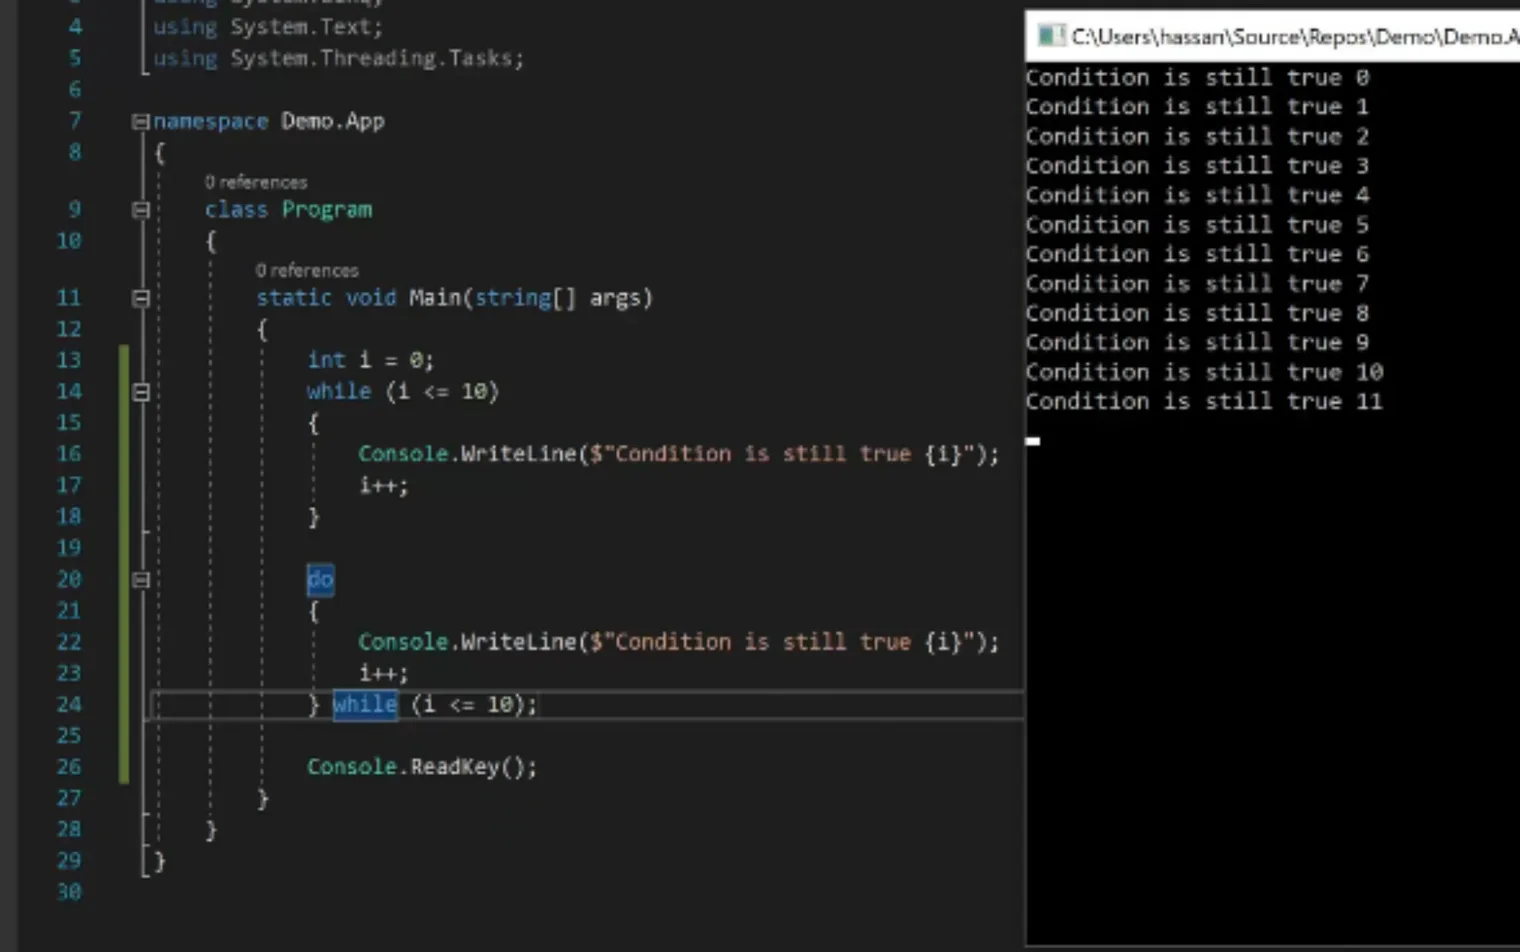
As per the image above, let’s copy and paste the Console.WriteLine content from our while loop down into our ‘do-while’ loop.
Your ‘while’ loop will not execute until the condition is met. Your ‘do-while’ loop will execute the code at least one time, before it checks if the condition is met.
‘Do-while’ would be used in a case where you need to execute the code at least once, and then check back again.
using System.Text;
using System.Threading.Tasks;

namespace Demo.App
{
    class Program
    {
        static void Main(string[] args)
        {
            int i = 0;
            while (i <= 10)
            {
                Console.WriteLine($"Condition is still true {i}");
                i++;
            }

            do
            {
                Console.WriteLine($"Condition is still true {i}");
                i++;
            } while (i <= 10);

            Console.ReadKey();
        }
    }
}
Above is a great example of the difference between the ‘while’ and ‘do-while’ loops. Notice our console counts to 11, not 10.
The ‘while’ loop printed 0 through 10 and stopped, and that left ‘i’ at 11. So by the time our program reaches the ‘do-while’ loop, its condition i <= 10 is already false.
And yet it still prints 11. Remember, the code will fire at least once before it checks to see if the condition is met. The ‘do-while’ loop runs its body first, printing 11 and moving ‘i’ to 12, and only then checks the condition, finds that 12 is greater than 10, and stops. Put a ‘while’ loop in its place and it would have printed nothing at all, because it checks the condition before it ever runs.
Both loops definitely have their uses, and it completely depends on what you want to do.